728x90
반응형
1. 코드의 목적
- HTML 코드 <script></script>안에 자바 스크립트를 넣어 보행자 신호등을 만들기
- 초록불 4초 >> 빨간불 3초 보행자 신호가 변경되도록 만들기.
- 초록불 일때 카운트를 보여주기
- 버튼을 누르면 시작
2. HTML+CSS+JavaScript 코드
<!DOCTYPE html>
<html lang="en">
<head>
<meta charset="UTF-8">
<meta name="viewport" content="width=device-width, initial-scale=1.0">
<title>신호등</title>
<style>
*{
margin: 0;
padding: 0;
}
#trafficBody{
position: relative;
width: 300px;
height: 800px;
background-color: whitesmoke;
margin: 0 auto; /*중앙 정렬*/
}
#trafficBody>#trafficLight{
position: relative;
background-color: black;
width: 100%;
height: 70%;
}
#trafficBody>#trafficLight>#firstLight{
top:50px;
background-color: green;
}
#trafficBody>#trafficLight>#secondLight{
top:100px;
background-color: red;
}
#trafficBody>#trafficTimer{
background-color: black;
width: 100%;
height: 30%;
color: green; /* 텍스트 색상을 초록색으로 변경 */
font-weight: bold; /* 텍스트를 굵게 */
font-size: 100px; /* 텍스트 크기를 크게 */
display: flex; /* Flexbox로 설정. 아이템을 중앙에 배치할 때 사용*/
justify-content: center; /* 내용을 가로 중앙으로 정렬 */
align-items: center; /* 내용을 세로 중앙으로 정렬 */
}
.Rectangle{
position: relative;
bottom: 50px;
width: 200px;
height: 200px;
border-radius: 10%;
margin: 0 auto; /*중앙 정렬*/
}
img {
width: 200px;
height: 200px;
object-fit: cover;
}
.button{
position: relative;
left: 100px;
width: 100px;
height: 100px;
margin: 100px auto;
background-color: white; /*버튼 배경 색*/
color: black; /*폰트 색상*/
font-size: 30px; /*폰트 사이즈*/
border:none; /*테두리 선 없음*/
border-radius: 10%; /*테두리 둥글게*/
}
.button:hover {
background-color:#002ead; /*마우스 위에 올렸을 때 색상 변경*/
transition: 0.7s; /*딜레이*/
}
.button:active {
background-color: #ffbf00; /*클릭하면 색상 변경*/
}
</style>
<script>
function startTimer() {
var timerDiv = document.getElementById("trafficTimer");
// 함수가 호출될 때마다 timeLeft를 3으로 초기화
timeLeft = 4;
// div 내용을 초기 상태로 설정
timerDiv.innerHTML = timeLeft;
// setInterval을 사용하여 1초마다 함수 실행
var timerId = setInterval(function() {
if (timeLeft > 0) {
// 남은 시간이 있으면 1초마다 감소
timeLeft--;
// div 내용 업데이트
if (timeLeft > 0) { // 0초가 되기 전까지는 남은 시간을 표시
timerDiv.innerHTML = timeLeft;
} else {
// 0초가 되면 텍스트를 비움
timerDiv.innerHTML = " ";
}
} else {
// 타이머 종료 시
clearInterval(timerId);
}
}, 1000); // 1000밀리초 = 1초
}
function cycleLights() {
setTimeout(function() {
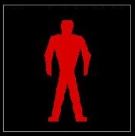
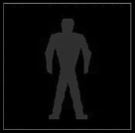
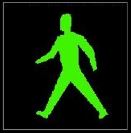
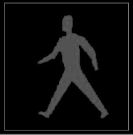
document.getElementById("firstLight").children[0].src = 'images/초록불_초록색.JPG';
document.getElementById("secondLight").children[0].src = 'images/빨간불_회색.JPG'; }, 0); // 초록불 이미지로 변경
setTimeout(function() {
document.getElementById("firstLight").children[0].src = 'images/초록불_회색.JPG';
document.getElementById("secondLight").children[0].src = 'images/빨간불_빨간색.JPG'; }, 4000); // 빨간불 이미지로 변경
}
window.runTrafficLight = function() {
startTimer(); // 타이머 재시작
cycleLights(); // 신호등 사이클 재시작
setInterval(function() {
startTimer(); // 타이머 재시작
cycleLights(); // 신호등 사이클 재시작
}, 7000); // 7초마다 반복
};
</script>
</head>
<body>
<div id = "trafficBody">
<div id = 'trafficLight'>
<div id="firstLight" class="Rectangle">
<img src="images/초록불_초록색.JPG" alt="First Light">
</div>
<div id="secondLight" class="Rectangle">
<img src="images/빨간불_빨간색.JPG" alt="Second Light">
</div>
</div>
<div id = "trafficTimer">
타이머
</div>
<button onclick="runTrafficLight()" class="button">Run!</button>
</div>
</body>
</html>- HTML 요소에 접근하여 이미지의 src를 변경하는 방법
document.getElementById("해당ID").src = "새로운 이미지 경로";- children[0] : Body영역에 div나 img에 id를 만들지 않을 경우 첫번째 자식 요소를 지칭한다. (두번째는 children[1])
3. Advanced
- 빨간불도 타이머를 빨간색으로 만들기
- 시간초 설정을 YAML로 만들어 외부에서 수정가능 하도록 만들기
- 초록불이 몇 초간은 초록불이 들어오다가 이후엔 깜박이기
- 웹 페이지에서도 이미지가 보이도록 수정
4. images폴더 자료
5. HTML 실행(컴퓨터에 저장된 이미지라 출력이 안됨..TT)


타이머

댓글