Coding 공부/NodeJS_Express
[Express_Ajax_MySQL] Person 추가 연습_DB연동_JQuery_Ajax 사용
CBJH
2024. 5. 13. 16:22
728x90
반응형
1. 디렉토리 구조
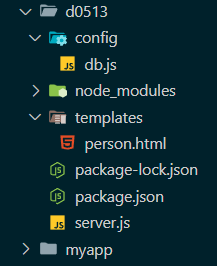
- templates 폴더
- person.html에 Ajax를 활용해 post 방식으로 json 객체를 보낸다.
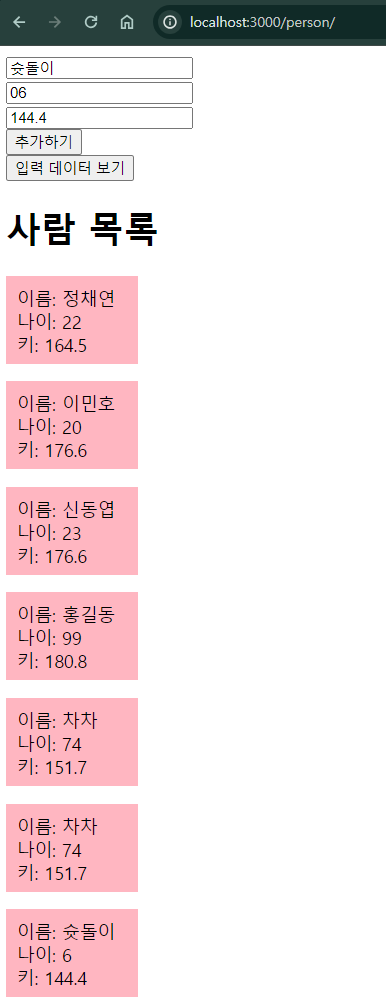
- Ajax를 활용해 버튼을 누르면 비동기 방식으로 person 테이블에 있는 자료들을 http://localhost:3000/personInfo에서 jason 객체로 받아온다.
- 동적으로 요소를 contennts 디비전에 추가한다.
- config 폴더
- db.js에서 MySQL의 DB에 연결하고 설정값을 넣는다.
- server.js
- express로 http://localhost:3000/에 연결한다.
- get 방식으로 http://localhost:3000/personInfo에 db에 select sql문을 보내 자료를 받아와 json형태로 보내준다.
- get 방식으로 http://localhost:3000/person/ 링크를 열면 template/person.html파일을 열도록 연결한다.
- post 방식으로 http://localhost:3000/person/add 할 때, db에 insert into sql문을 보내 자료를 추가한다.
2. 코드
2.1 db.js
var mysql = require('mysql')

const db = mysql.createPool({
    host:'localhost',
    user:'root',
    password:'1234',
    database:'practice',
    port:3306
})

module.exports=db;
2.2 person.html
<!DOCTYPE html>
<html lang="en">
<head>
    <meta charset="UTF-8">
    <meta name="viewport" content="width=device-width, initial-scale=1.0">
    <title>Movie Data</title>
    <script src="https://code.jquery.com/jquery-3.6.0.min.js"></script>
    <script>
        $(document).ready(function(){
            fetchPersons()
            addPerson()
        })
        function addPerson() {
                $('#addPersonForm').on('submit', function (e) {
                    e.preventDefault(); // 폼의 기본 제출 동작 방지

                    var formData = {
                        name: $('input[name="name"]').val(),
                        age: $('input[name="age"]').val(),
                        height: $('input[name="height"]').val()
                    };

                    $.ajax({
                        type: 'POST',
                        url: '/person/add',
                        contentType: 'application/json',
                        data: JSON.stringify(formData),
                        success: function (response) {
                            alert('사람 정보가 추가되었습니다.');
                            console.log(response);
                        },
                        error: function (error) {
                            alert('오류 발생');
                            console.log(error);
                        }
                    });
                });
            }

        function fetchPersons() {
            $("#input_data_button").on('click',function(){
                // 데이터가 이미 표시되어 있으면 숨기기
                if ($("#contents-person").children().length > 0) {
                    $("#contents-person").empty();
                } else {
                    // 데이터를 가져오고 표시
                    $.ajax({
                        method: 'GET',
                        url: 'http://localhost:3000/personInfo',
                        dataType: 'json'
                    }).done(function(response) {
                        $("#contents-person").empty();
                        response.forEach(person => {
                            var personItem = $('<ul class="person-item"></ul>');
                            personItem.append($('<li class="contents-box"></li>').text("이름: " + person.name));
                            personItem.append($('<li class="contents-box"></li>').text("나이: "+person.age));
                            personItem.append($('<li class="contents-box"></li>').text("키: "+person.height));
                            personItem.css({
                                "height": "60px",
                                "width": "100px",
                                "background-color": "lightpink",
                                "padding": "10px",
                                "margin-bottom": "5px",
                                "list-style": "none"
                            });
                            $("#contents-person").append(personItem);
                        });
                    }).fail(function(jqXHR, textStatus){
                        console.error('Ajax request failed: ' + textStatus);
                    });
                }
            });
        }
    </script>
</head>
<body>
    <div id="wrap">
        <div id="header">
            <form id="addPersonForm">
                <input type="text" name="name" placeholder="이름 입력" required><br>
                <input type="number" name="age" placeholder="나이 입력" required><br>
                <input type="text" name="height" placeholder="키 입력" required><br>
                <button type="submit">추가하기</button><br>
            </form>
            <button id="input_data_button">입력 데이터 보기</button>
        </div>
        <div id="contents">
            <h1>사람 목록</h1>
            <div id="contents-person"></div>
        </div>
    </div>
</body>
</html>
2.3 server.js
const express = require('express');
const app = express();
const port = 3000;
const db = require('./config/db.js') // 데이터베이스 연결 설정 불러오기

// 정적 파일 경로 설정
app.use(express.static('templates'));
app.use(express.json());
app.use(express.urlencoded({ extended: true }));


// API 엔드포인트
app.get('/personInfo', (req, res) => {
    db.query('SELECT * FROM person', (err, data) => {
        if (err) throw err;
        res.json(data);
    });
});

// 기존 API 엔드포인트 대신 HTML 파일 제공
app.get('/person', (req, res) => {
    res.sendFile('person.html', { root: __dirname + '/templates/' });
});


app.post('/person/add', (req, res) =>{
    const {name, age, height} = req.body //비구조화할당
    const sql = 'INSERT INTO person (name, age, height) VALUES (?, ?, ?)';
    db.query(sql, [name, age, height], (err, data) => {
        if(!err){
            res.send(data)
        }else{
            res.send(err)
        }
    })
});

app.listen(port, () => {
    console.log(`Server running on http://localhost:${port}`);
});
3. 실행 방법
- 디렉토리들을 만들어주고 코드를 작성한다.(node_modules, package-lock.json, package.json 파일은 콘솔창에서 설치하면 생긴다.)
- cmd 콘솔창을 열어 명령어를 입력한다.
- 폴더를 생성한 곳으로 콘솔창을 이동한다.
cd.. #상위 폴더로 이동
d: #d드라이브로 이동
cd d0513 #d0513폴더로 이동- express와 mysql을 설치한다.
npm install express
npm install mysql- express로 서버에 연결한다.
node server.js- 웹 브라우저(크롬, 엣지)를 열어 호스팅한 주소를 입력한다.
- http://localhost:3000/person/
4. 실행 화면